

How To Draw Picture Of Aircraft Cicuit Breaker
Let's brainstorm with an understanding of what an electric excursion actually is. In society to have an operating electric excursion, 3 elements are required:
1. Source
Brusque Excursion Finding Kits on Amazon
The source is the means to utilise a voltage to a path charging the electron particles which creates a flow of electron to constitute the "electric current" that enters the path at the "source" flowing through the load, and leaves past way of a "render" path dorsum to the "earth ground." Battery-powered apparatuses such as cellphones, tablets, laptops, even cars, too require a render path to their DC source, and that's normally through their chassis-"ground".
two. Load
A load is one or a series of components that perform work whenever electricity is practical to it. A load can be a simple lite fixture, to a more intricate assembly of thousands of resistors, semiconductors, inductors, capacitors, all connected together between the "source" and the "return" path.
three. Path
A path is created when conductors connect one side of a "load" to the "source" while connecting the other side to the "return". When charged electron particles observe a path to menses from the source through the load and dorsum to the source through the Neutral or the mutual basis. The loop is called an electrical circuit.
Instance 1
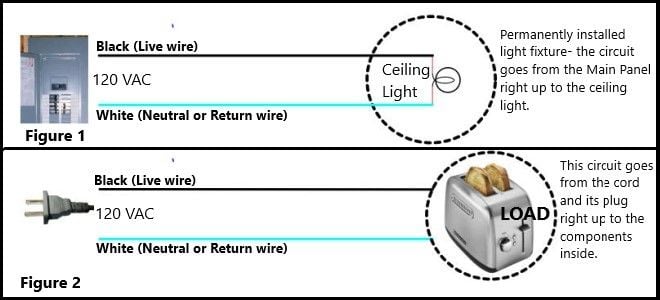
When a 60 Watts lamp is working normally, the outlet is the source (120 volts), the light seedling is the load cartoon 0.6 amps from the excursion, the other side of the lamp completes the circuit (Figure 1) by returning the charge through the Neutral line to the source.
Example 2
The 1200 Watts toaster in figure 2 is the load drawing xi amps when plugged into a 120 volts "source" activating electron particles that "returns" to the source through the neutral wire (white).
It should be noted at this point that the neutral (white) side of the usher being the render path to complete the excursion to the source doesn't comport current, only since a curt excursion could put information technology there causing a potential hazard, the neutral conductor continued to the Globe Ground at the chief breaker panel would crusade the breaker to trip should the neutral become "live".
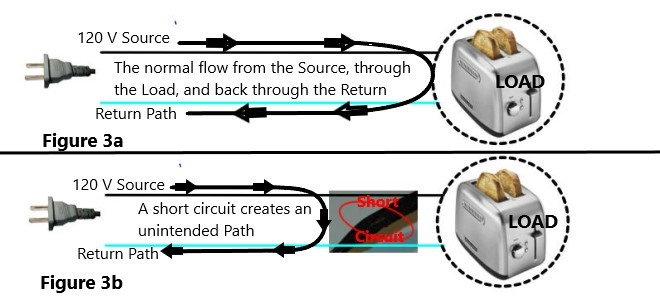
Had the cord been damaged similar partially burnt as in Effigy 3b, letting both of the wires touch together, plugging it in the outlet would create a new path with a very low resistance of under 2 Ohms resulting in a surge of over 55 amps of electric current, tripping the breaker rated at xv or 20 amps.
Step 1 - Make the Stardom
Before starting, it has to be determined if dealing with a short circuit or a circuit overload which both consequence with a tripped circuit billow.
If a fifteen amp circuit is already running a microwave oven and a teapot and someone adds a toaster to the mix, the amps drawn will exceed the 15A rating and trip the breaker. Resetting the breaker returns information technology to normal.
When the aforementioned toaster is plugged past itself into the outlet, bare wires touching together will also trip the breaker simply it will be impossible to reset as long as the blank wires keep touching. That's a Short Circuit (Effigy 3b).
Step 2 - Assess Possible Causes
There are obvious signs and clues, such as scent, loose wires, frayed wires, burnt plastic, scorched metallic, loose outlet, loose terminals, that must be constantly sought for while searching for the problem.
Step 3 - Trace a Household Brusque Circuit to its Source
When the breaker doesn't reset...
3a - Disconnect
unplugging everything from that billow's circuit should tell if information technology's a shorted appliance or a shorted billow circuit. If the breaker tin can and so exist reset, plug each and every apparatus back in until one trips the breaker once more. That apparatus needs fixing.
3b - Check the Breaker
with everything unplugged, if information technology still doesn't reset, the problem resides in the breaker's circuit within the walls and to the panel. This circuit includes one billow, perhaps light fixtures and most likely a few outlets.
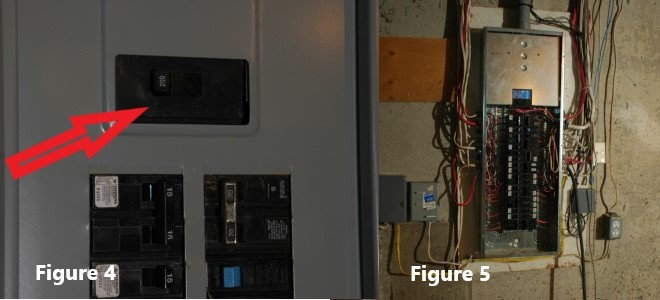
The breaker should exist checked first, but that will require using a bombardment-powered trouble light before switching OFF the principal excursion billow at the top of the electric panel and shutting all power off. This is to eliminate any adventure of electrocution as the front embrace with the access door has to be removed to expose the circuit breakers and the wiring into view.
3c - Remove the Wire
The wire connected to that billow'southward terminal should be removed from its terminal connectedness and the breaker tried over again for resetting. If it doesn't reset, the breaker is the problem. If it stays ON, keeping from touching any part of the panel, briefly turn ON then back OFF, the primary breaker to the panel and if the circuit billow trips off with or without power, information technology needs to be replaced.
Prophylactic Note: KEEP THE Main BREAKER OF THE Panel TURNED OFF.
3d - Switch off Dedicated Breaker
With the breaker trusted in good condition, the breaker's wire is then screwed dorsum on the breaker's terminal and the DEDICATED Circuit BREAKER SWITCHED OFF to keep the ability off that circuit while resuming the troubleshooting. The front cover of the panel can then be put and secured back in identify and the primary top circuit breaker can be turned back on.
3e - Check Local Outlet
With this done, the outlet closest to the breaker console should be closely inspected past removing the faceplate. A multimeter assault continuity should be used to take a reading between the alive (blackness) last and the grounded electric box to make sure information technology'southward still at almost 0 Ω (short-circuited). A reading of ∝ (infinity) would indicate that the trouble may be intermittent or was corrected while working at the outlet. It should be inspected further for deterioration marks and replaced if there is any damage.
3f - Disconnect Local Cable
Two or more than cables inside that box would betoken how many fixtures or outlets are hooked upwardly to this junction box. The black wire from each of them should be disconnected from each other and measured to discover out if the curt excursion lies betwixt that point and the circuit breaker, or which of the other cables.

3g - Find the Damage
If it's towards the breaker, the curt may accept been caused by a rodent chewing the insulation off, scraped insulation while the cable was installed, or maybe it was perforated by a nail or screw or even a drill while doing some restoration project. If it's the example, the cablevision may need replacement or splicing, or even crave assistance from a professional.
3h - Remove Fixture
If the short lies towards one of the other cables, the faceplate or the fixture itself should be removed from the affected box and the same test r epeated from Step 3e.
3i - Narrow Down the Location
This pace is to make up one's mind if the short is betwixt the previously tested outlet and this one, or towards the adjacent outlet box. The brusque-circuited section is determined as soon equally a 0 Ω reading occurs between the current outlet box and the previously tested one. Proceed the procedure until that happens, then repair the faulty wiring or component.
When you purchase through links on our site, we may earn commissions at no toll to you.

Source: https://www.doityourself.com/stry/how-to-trace-a-short-circuit
Posted by: thompsoncleggen.blogspot.com
0 Response to "How To Draw Picture Of Aircraft Cicuit Breaker"
Post a Comment